Installing a rugby net may sound straightforward — place the net, secure it, and start training. But in reality, proper installation and upkeep make all the difference between a safe, durable, and effective training aid versus one that quickly fails or becomes hazardous.
In this guide, we’ll explore practical installation tips, maintenance strategies, and safety measures for rugby nets. Whether you’re managing a professional club, school team, or community field, these insights will help you get the most out of your equipment.
For a closer look at high-quality rugby nets, visit Yichen Sports Rugby Net.
1. Preparing the Site Before Installation
Before you set up your rugby net, invest time in site preparation.
Choose a flat, stable surface: Avoid uneven ground or soft soil that can destabilize the frame. Grass pitches are fine if reinforced with proper anchors.
Clear surrounding space: Remove debris, stones, or sharp objects that could damage the net or injure players.
Measure dimensions: Ensure the training area matches the size of the net. Oversized nets squeezed into small areas increase wear and reduce efficiency.
Check wind exposure: For outdoor setups, account for prevailing wind direction. Strong winds place stress on frames and anchoring systems.
Pro tip: Mark the installation area with cones or chalk lines before placing the net. This ensures symmetry and reduces the need to reassemble later.
2. Setting Up the Frame and Anchoring System
The frame is the backbone of your rugby net. A shaky frame undermines performance and safety.
Assemble carefully: Follow the manufacturer’s guidelines step by step. Incorrect connections can weaken structural integrity.
Use the right anchors: Heavy-duty U-pegs, ground stakes, or ballast weights are essential. A rugby ball impact can exert significant force, so anchoring prevents tipping.
Balance flexibility and strength: Fiberglass rods provide controlled flexibility, while steel frames deliver strength. Combining both often yields the best results.
Check alignment: Frames must be square and level to avoid uneven tension in the netting.
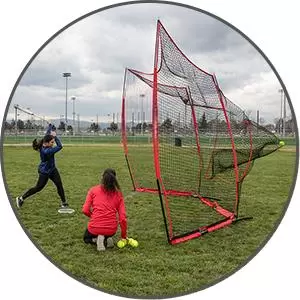
Example: The FORZA Rugby Passing Net uses powder-coated steel frames plus fiberglass rods, stabilized by U-pegs. This design ensures long-term sturdiness (Net World Sport).
3. Securing the Netting Properly
Once the frame is in place, it’s time to attach the net.
Tension evenly: Avoid pulling one side tighter than the other. Uneven tension creates weak points and leads to premature tearing.
Use durable ties or clips: High-strength Velcro straps, zip ties, or manufacturer-provided fasteners are best. Avoid thin ropes that fray quickly.
Hemmed edges: Check that the net edges are reinforced. Hemmed or bound edges prevent unraveling under stress.
Check for sagging: Nets should have a slight give for shock absorption, but not hang loosely.
Regularly test net elasticity by applying gentle pressure before training sessions.
4. Maintenance Tips for Longevity
Proper maintenance extends your net’s lifespan and saves replacement costs.
Clean regularly: Wash off mud, dirt, and salt after games or practices. A simple rinse with water prevents mold and UV damage.
Inspect frequently: Look for frayed strands, rust on frames, or weakened anchors. Address small issues before they become major failures.
Store correctly: If not in use for long periods, disassemble and store indoors. Keep in a cool, dry place away from direct sunlight.
Rotate usage areas: If you have multiple nets, rotate their use to balance wear.
Reference: G&M Safety Netting highlights how UV-treated polypropylene extends net longevity in outdoor sports environments (G&M Safety Nettin).
5. Safety Considerations During Use
Safety must be prioritized during rugby net training sessions.
Check before every session: Ensure the frame is stable, anchors are secure, and the net is intact.
Keep sidelines clear: Ensure players waiting to train stay clear of the impact zone.
Use padding where necessary: Frame padding reduces injury risk if players collide with the structure.
Weather awareness: Avoid using nets during extreme winds, lightning, or storms.
Coach supervision: Especially in youth training, always have adult oversight when nets are in use.
6. Common Mistakes to Avoid
Many nets fail prematurely due to simple installation errors:
Insufficient anchoring – leading to tipping during use.
Improper tensioning – resulting in sagging nets that reduce accuracy training.
Leaving nets outdoors year-round – accelerating UV and weather damage.
Overloading nets – using them beyond their design purpose, e.g., catching multiple heavy balls simultaneously.
Avoiding these mistakes ensures a safer and more cost-effective setup.
7. Practical Checklist for Coaches and Groundskeepers
Here’s a quick pre-session checklist you can adapt:
| Task | Status |
|---|
| Ground level and debris-free | ✅ |
| Frame bolts and joints tightened | ✅ |
| Anchors secure and stable | ✅ |
| Net tension balanced | ✅ |
| No fraying, rust, or sharp edges | ✅ |
| Safety zones clear of obstacles | ✅ |
Keep this laminated near storage areas so staff can run through it before each use.
8. Extending Net Value Through Smart Investment
While cheaper nets may seem attractive initially, they often fail after one or two seasons. Investing in a durable rugby net with UV-resistant materials, powder-coated frames, and reinforced seams pays off in the long run.
For example, the nets at Yichen Sports Rugby Net are designed with durability and training efficiency in mind, making them a reliable choice for both amateur and professional clubs.
Conclusion
Installing and maintaining a rugby net is more than a simple setup — it’s an ongoing process of proper preparation, careful anchoring, regular maintenance, and strict safety oversight. When done correctly, a rugby net can serve for many seasons, ensuring efficient training sessions and safe environments for players and coaches alike.
By following these tips, clubs can reduce equipment costs, prevent injuries, and optimize their training time. A small investment in careful setup and upkeep yields significant rewards on the pitch.